
Hello everyone! It’s been a very busy summer and fall, and I’m a bit ashamed that this is only my second post since we began the earthbag wall project in June.
For those of you that are new to Seattle Homestead, we do an annual post that reviews the past year’s accomplishments and lays out goals for the year ahead. We moved in to our home in April 2011, so we’re finishing up our 2nd year and heading strongly into our 3rd year with a number of projects completed and in progress, and plenty more to come.
Here’s our goals for year one and goals for year two so you can see where we started and how far we’ve come.
In last year’s goals and year-end-review post, I made a lofty claim about limiting the scale of our projects.
2011 Homestead Things to Improve On: Scale – One permaculture principle involves starting with small-scale systems and building your way up, and frankly it’s one of the hardest principles for me to embrace and obey. We have so much we want to do on the property that it’s difficult to limit ourselves. As a result, not everything gets done as well as it could. Our garden, for example, could have been much more productive with some additional attention. We also lost a few of our fruit plants, such as the tea tree and possibly the raspberry cane. This is part of the growing process of course, both literally and figuratively, but scale is still something we need to keep in mind during our projects.
To put it mildly, the thought of scale went out the window a few shorts months after I wrote that.
Homestead Projects Completed During 2012:
The scope of our 2012 projects was extensive. We spent nearly every weekend from January to early November working on our yard – the main exception being 4 weekends in August that we took off for our wedding and traveling afterwards (it was a much needed break from the homestead, to say the least).
To summarize, we spent 2012 working on the following:
- Completely transforming the hardscaping of our yard by removing the existing chain link fence and hedges.
- Completing the majority of construction on a 120+ foot long earthbag wall (6 feet in height).
- Building a chicken coop and raising 5 hens that have been laying eggs since September.
- Adding a gorgeous brick patio and walkway to make the focal point of the new courtyard.
Here’s a glimpse at my best estimates of the time that was invested in each project:
Interior Home Improvements:
- Home energy audit, followed by:
- Caulking near baseboards to reduce air transfer from crawlspace into the home
- The audit was completed by a energy contractor, and the caulking was done by a local handywoman service, along with some other miscellaneous home improvement tasks.
- Subway tile backsplash in kitchen
- Long afternoon project completed by Kristina and our good friend Bob
Removing things from the yard to make room for homestead projects:
- Sheet mulched remainder of front yard, about 1500 square feet
- Time: One afternoon with 4 of us – January
- Removed unproductive & overgrown quince
- Time: 4 weekend afternoons solo – Feb/March
- Removed dead cherry tree and saved the limbs and trunk for hugelkultur beds
- Time: 45 minutes for Bob with chainsaw during April work party
- Removed 30 overgrown and hideous hedges that surrounded our property
- This photo illustrates just how ugly these hedges were in the winter. The photo looks worse due to some camera filters, but you still get a feel for how overgrown they had become.
- Here’s what they looked like in the summer after we moved in.
- Time: Half afternoon workparty with 6 friends during April work party
- Removed 120+ feet of chain link fence
- Time: Half afternoon workparty with 6 friends during April work party
- Shredded quince, hedges, and other branches
- Time: 3-4 weekends for two of us during April and early May
Non-Wall-Related Yard Improvements:
- Built fence for dog run
- Time: ~4 weekends solo during March & April
- Built chicken coop (95% complete)
- Time: 4 weekends with Kris & I during Memorial Day & early June
- Built retaining wall in front yard and backfilled
- Time: ~3 weekends mostly solo during March & April
- Patio and front walkway installed
- Time: 3 full workdays for 3 crew members (this project was hired out to our friends at Akina Design in order to have it finished prior to family visiting in early August)
And Finally, Work Completed on The Wall…
- Had property surveyed to make sure we were building wall within city right-of-ways.
- Trenched and filled gravel base for wall
- Time: One weekend in June
- Held an excellent weekend-long Earthbag Wall Building Workshop to kick off the wall construction.
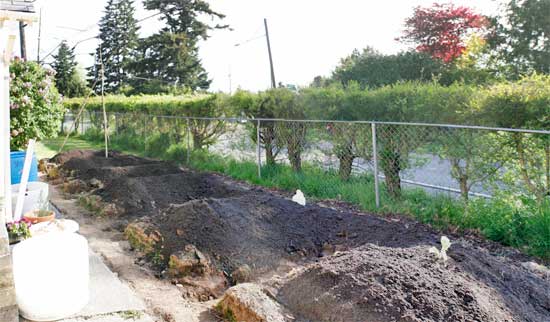
- Bag Construction:
- This part of the wall is 95% completed
- Here’s a photo of the bag progress we had made by late July. We’ll have another post within a few months that describes the general building process for the wall with more photos.
- Time: June, July, September, and October
- Stucco Wire:
- This part of the wall is 75% completed
- This was unexpectedly the most tedious task of the wall project. You have to attach chicken wire or another form of lathe to the wall in order for the concrete to stick to the bags. Attaching the chicken wire to the bags has been somewhat miserable, and we haven’t been able to find a decent way to make the process go faster.
- Time: July, September, and October
- Stucco Scratch Coat:
- This part of the wall is 60% completed, but it’s only the first coat of stucco.
- Here’s a photo of the stucco going onto the wall.
- Time: July, August, September, and October
And best of all, we also spent some time in 2012 on planning our wedding here in West Seattle that took place in August:

And the final cherry on top of an already great year – just this past week, Seattle Homestead was mentioned in Better Homes & Gardens for the January 2013 issue:

So, thanks to all of our new subscribers joining us from BH&G. I can’t promise that you won’t think we’re crazy, but hopefully you’ll pick up something you like along the way.
2013 Projects & Goals:
So, with so much completed last year, it only brings to mind how much is remaining for this next year. Priority #1 is completing the rest of the wall project and getting our yard back into a respectable state.
Currently there is about 40 feet of the wall that is tarped up, since we were unable to complete the entire base coat of stucco. As the temperatures warm up a bit and we get a few dry weekends, I’ll be back out there to complete the bag construction, and then start applying the chicken wire lathe to the bags so we can prepare to apply the first coat of stucco to the remaining section of wall.
From there, we’ll need to apply two more coats of stucco to wall total. The second coat will smooth out the roughness of the base coat (also called the scratch coat). The final coat will be the finish coat.
The final color of the wall will be a deep orange/red terra cotta color. To stain the concrete we’ll be using Copperas, which is a type of Iron Sulfate often used by gardeners to add iron to the soil and add more “green” to yellow plants. On the package of Copperas there’s a warning that says “this product will permanently stain cement.” Which just happens to be our goal ;-). Take a look at some of the amazing colors that have been achieved by other people who have used Copperas to stain their cement floors:
 Concrete Stain")
By adding in coffee grounds to the Copperas stain we’ll be able to reach even deeper hues. Beforehand we’ll be testing lots of variations on hidden spots of the wall to figure out the best mixtures. Should have more information on this later in the year, and I’m really looking forward to seeing how it turns out.
Aside from that, the remaining work on the wall is a lot of finish work, and finally adding the stone cap to the wall. This section is a bit of an unknown for me, but I think it can be completed in under a month of weekends.
A bulleted list of tasks we’re looking to complete this year:
Finishing the Wall:
- Bag Construction
- 5% remaining
- Estimated Time Remaining: 1 weekend remaining for primary structure –
- Completing Garden Beds (the inside of our wall has raised garden beds attached to it):
- Estimated 2 weekends remaining for bag construction on front of garden beds
- Estimated 2 days for waterproofing of beds after stucco scratch & brown coat.
- Stucco Wire Application
- 15% remaining
- Estimated Time Remaining: 2 weekends with 2 people working both days
- Installation of Porthole Truth Windows
- Stucco Scratch Coat
- 40% remaining
- Estimated Time Remaining: 2 weekends with 2 people working both days
- Stucco Brown Coat
- 0% Completed
- Estimated Time: 2-3 weekends
- Wall Detailing
- Installation of Address Numbers
- Tiling on Buttresses
- Estimated Time: 2 weekends
- Installation of Stone Cap on Top of Wall
- Estimated Time: 4 weekends?
- To do:
- Shopping for stone options and pricing
- Preparation of wall top for mortar
- Cutting and placement of stone
- Mortar of stone
- Stucco Finish Coat
- Estimated Time: 2 weekends
- Final Wall Stain
- Estimated Time: 2 weekends
Other Hardscaping Remaining in the Yard:
- Front gate / arbor (check out the diagram that I sketched out for our front gate)
- Estimated Time: 3 weekends
- Back gate by driveway
- Estimated Time: 1-2 weekends
- Installation of front steps and removal of front railing
- Estimated Time: 1 weekend
Plants:
While the wall will take up much of our time during the spring and summer, we do at some point want to get some plants in, seeing as that’s why we started this whole endeavor in the first place. We’ll also need to address some of the remaining ivy, holly, and blackberry in the back portions of the yard.
- Remove Ivy
- Remove Holly
- Replace with Filbert Hedge? $60 for 5 plants at Raintree, covers 15 feet…
- Remove Himalayan Blackberry (lowest priority)
- Spring trees? Will need to wait until garden beds are completed to decide to order these.
- Fall trees? These are more likely than spring ones.
And, unbelievably, I think that’s it. I am seriously looking forward to hanging up my hammock on this finished wall…